
How to play Minesweeper: numbers, flags and safe squares
Understand Minesweeper numbers and flags with simple examples. Learn when a square is safe and choose a board size for your first game on Arcajoy.
What a number tells you
A number counts mines in all eight neighbouring squares, including diagonals. If a revealed 1 touches just one unopened square and the other neighbours are known to be safe, that unopened square is a mine. If there are several unknown neighbours, the 1 alone does not tell you which one contains it. Compare the surrounding numbers before deciding.
When to flag and when to open
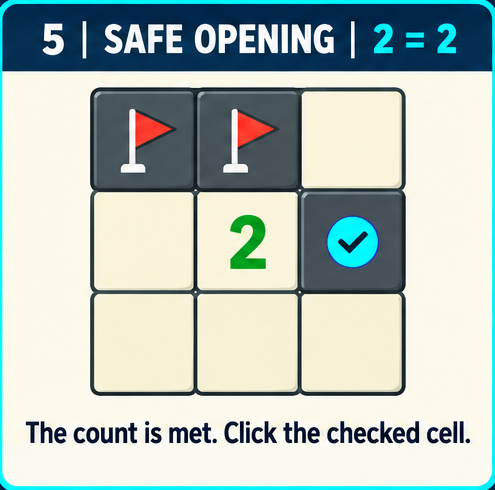
A flag is your note, not confirmation from the game. If a 2 has two neighbours you have logically identified as mines, all its other neighbours are safe to open. If you placed those flags by guessing, this conclusion is unreliable. Use right-click or a long press to toggle a flag. The first revealed square is safe, but later moves still need care.
Choose a board and practise deductions
Start with 8×8 and 10 mines. Larger options are 12×12 with 24, 16×16 with 40 and 20×20 with 80. The objective is to reveal every non-mine square. Work along the boundary between open and hidden squares, checking what each number adds. If the visible clues do not determine a move, do not treat an uncertain square as proven safe.
Your first game, step by step
- Choose the 8×8 board with ten mines. Its compact size makes it easier to see the whole exposed boundary and compare neighbouring clues.
- Open a cell and look for a number with few covered neighbours. The first opening is safe, but it does not reveal where the remaining mines are.
- Count every covered neighbour, including diagonals. Separately account for mines you have actually proved, rather than cells you merely flagged as a guess.
- If the remaining mine count equals the covered neighbour count, all those neighbours are mines. If all adjacent mines are known, the other neighbours are safe.
- Recheck nearby conditions after each opening. A new patch of information can resolve a number that previously had more than one explanation.
Example: comparing two clues
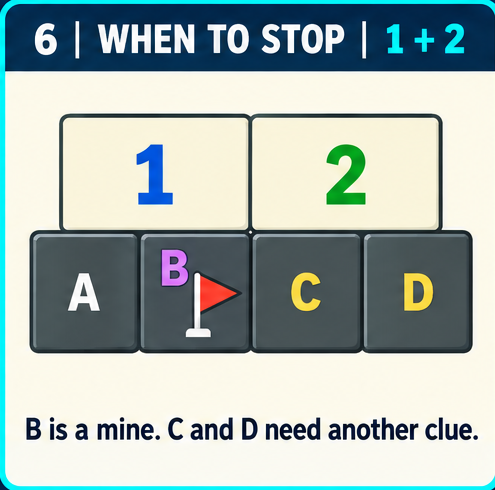
Suppose one clue has only covered cells A and B left, with exactly one mine between them. A neighbouring clue covers A, B and C, also with exactly one mine. C must be safe: the required mine is already in A or B. You still do not know which of those two contains it, but that uncertainty does not prevent opening C.
This deduction requires complete accounting. If the second clue also has an unknown neighbour D, C is no longer proved safe. Mentally list all unknown neighbours instead of recognising a familiar-looking pattern from two numbers. Subtract already established mines from each clue before comparing the remaining sets.
Common mistakes to check
| Situation | Check |
|---|---|
| Flags produce contradictory conclusions | Revisit the evidence for each flag; the marker itself proves nothing. |
| A number seems to count an extra mine | Count diagonals and neighbours on both sides of the exposed boundary. |
| Two cells remain equally possible | Look for another constraint; uncertainty is not a proof of safety. |
| A safe region is open but the game continues | The goal is to open every non-mine cell, not merely place flags. |
An exercise in careful reasoning
Before one of your next moves, state the reason: 'Both mines next to this two are established, so its other neighbours are safe.' Then check the two proofs. This small pause is more useful than a chain of fast clicks because it distinguishes a counting error from a position with insufficient information.
Move to a larger board when you can reliably connect several clues. Longer games require attention to old flags as well as new numbers. If one area offers no definite move, inspect another boundary. These methods explain logical deductions; they do not promise that every position you encounter can be resolved without risk.
Play now
Visual Minesweeper deductions
These original diagrams turn common decisions into small checks. A red flag means a mine has been proved. A cyan tick marks a square that is safe to open. The labels are not moves to memorise: count the exact neighbours in your own position before applying the idea.
1. When the count equals the candidates
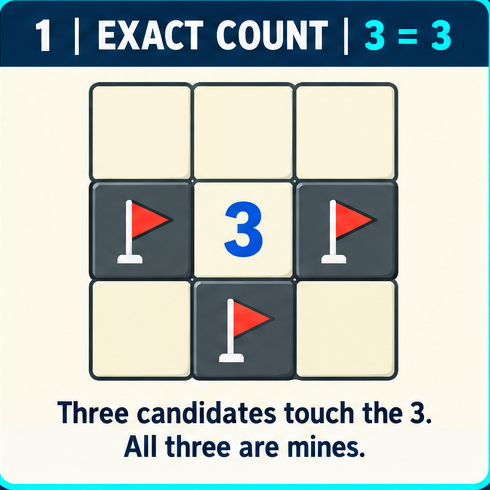
First remove every revealed square from the calculation. If a 3 touches exactly three covered candidates, all three must contain mines. This is a proof, so the flags are useful information for the clues around them.
2. When a clue is already satisfied
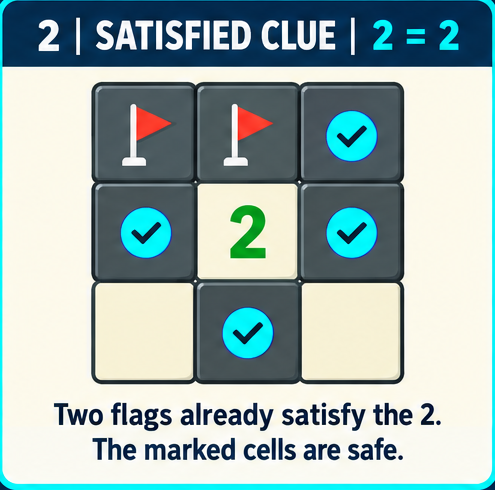
A clue stops creating new mines once its required number has been accounted for. If a 2 already touches two proven mines, every other covered neighbour of that 2 is safe. Open one of those safe squares to gain a new clue; do not add a third flag.
3. Compare overlapping clues
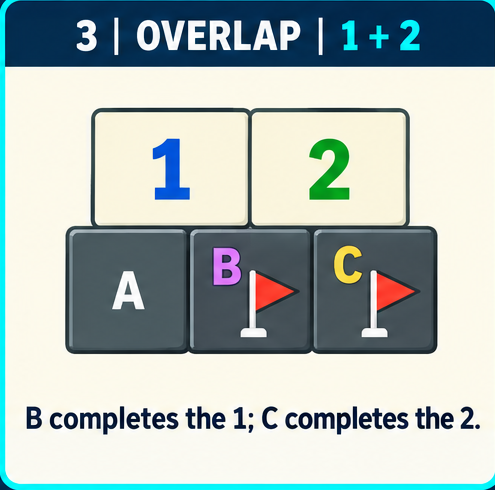
Two nearby numbers often share covered cells. In the 1-and-2 example, the 1 has only A and B as candidates, while the 2 has B and C. B must supply the mine for the 1, and C then supplies the extra mine required by the 2. Listing the candidates prevents a familiar shape from becoming a guess.
4. Use the board edge as information
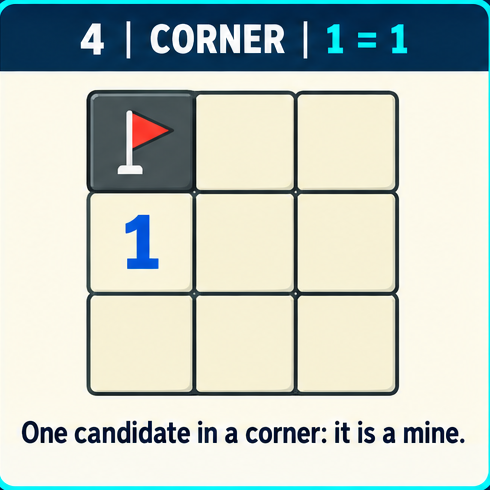
At a corner, a number has fewer possible neighbours than it would in the middle of the board. A corner 1 with one remaining covered neighbour forces that neighbour to be a mine. Count actual touching cells: a nearby square that does not touch the clue does not belong to its set.
5. Open a square only after proving it safe
The safe-opening card shows the opposite conclusion. Two flags satisfy the green 2, so the checked covered square cannot be a mine. This is the best type of opening: it adds information without spending a life or relying on luck.
6. Know when the clues are still incomplete
Sometimes comparison gives only part of the answer. Here B is forced, but the 2 still needs one mine among C and D. Neither C nor D is safe yet. Leave the pair unflagged, inspect another exposed boundary and return when a new clue separates them.
A repeatable order for the next move
- List every covered neighbour of a useful clue, including diagonals.
- Subtract only mines you have proved.
- Check whether the remaining mine count is zero or equals the remaining candidate count.
- Compare candidate sets from overlapping clues.
- If two possibilities remain, look elsewhere instead of marking a guess as a fact.
Questions and answers
Does a flag make a square safe?
A flag marks your conclusion; it does not reveal the square. Treat it as a fact only when the neighbouring numbers prove it.
What should I do when no safe move is obvious?
Recount another edge of the opened area and compare overlapping clues. Do not turn a guess into a chain of assumed facts.
Are diagonal neighbours counted?
Yes. A number counts all adjacent squares, including diagonal ones.